


Butter Wash (Pareve Option Below) • Egg • Contains Gluten
1 large loaf (8–10 servings)
Intermediate
45 minutes
3½–4 hours
HaMotzi
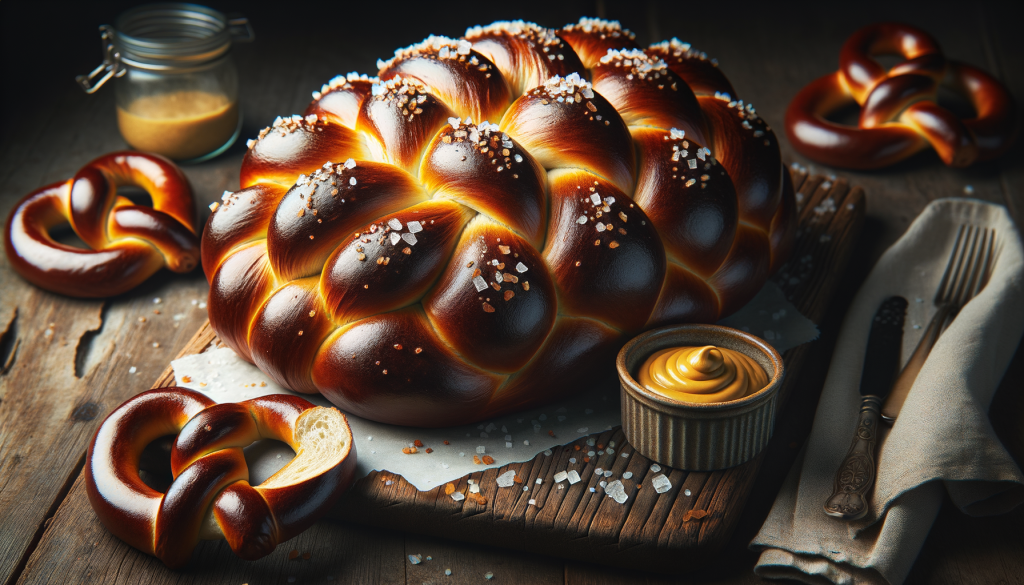
Pretzel challah is the bread that happens when two beloved traditions collide — and the result is better than either one alone. Take the soft, pillowy, egg-enriched dough of a classic challah. Braid it into that iconic six-strand pattern. Then, just before baking, dip the entire loaf into a baking soda bath that transforms its surface into something extraordinary: a dark, mahogany-brown pretzel crust with that unmistakable alkaline tang, sprinkled with flakes of coarse salt that crunch against the tender crumb beneath.
The magic is in the contrast. Outside, you get the deep color and slight chewiness of a Bavarian soft pretzel — that rich, almost caramel-like crust that no amount of egg wash alone can produce. Inside, the bread remains pure challah: soft, slightly sweet, golden from eggs and oil, pulling apart in long, tender strands. Every bite delivers both textures at once, and it is genuinely difficult to stop eating.
Pretzel challah has swept through Jewish bakeries across America in the last decade, and for good reason. It respects the halachic and spiritual role of challah — this is still lechem mishneh, still HaMotzi bread, still the anchor of the Shabbat table — while adding a playful, modern twist that delights everyone from the youngest child reaching for a salt crystal to the most seasoned baker admiring that burnished crust.
If you have already mastered our Classic Kosher Challah, pretzel challah is the next natural step. The dough is nearly identical — the transformation happens entirely in the baking soda bath and that final shower of coarse salt.
What Makes This Pretzel Challah Special
Pretzel challah is not just challah with salt on top. Every step is designed to deliver that authentic pretzel experience on a foundation of traditional challah dough:
- Baking soda bath creates the pretzel crust — a brief dip in a boiling water–baking soda solution triggers the Maillard reaction on the dough’s surface, producing that deep mahogany color and distinctive alkaline tang without any food coloring or artificial browning agents.
- Classic six-strand challah braid — the traditional braiding technique is preserved in full. The baking soda bath does not damage the braid; it enhances it, darkening the ridges and valleys to create stunning visual contrast.
- Coarse salt topping — pretzel salt or flaky sea salt is pressed into the surface after the bath, adhering perfectly to the alkaline-treated crust. The salt crystals add crunch, flavor, and that unmistakable pretzel-shop appearance.
- Egg-enriched challah interior — beneath the pretzel crust, the crumb is 100% challah: golden, soft, slightly sweet, and perfect for tearing or slicing.
- Dairy or pareve flexibility — brush with melted butter after baking for a dairy pretzel challah, or use an egg wash and oil for a fully pareve version suitable for any Shabbat meal.
Challah Meets American Pretzel Culture
Challah and the soft pretzel share more history than most people realize. Both are breads of European origin shaped by immigrant communities in America. Challah traveled with Ashkenazi Jews from Eastern Europe; the soft pretzel arrived with German immigrants to Pennsylvania. For over a century, they occupied parallel worlds — challah on the Shabbat table, pretzels on the streets of Philadelphia and New York. The idea of combining them was, in retrospect, inevitable.
Pretzel challah first appeared in artisan Jewish bakeries in the early 2010s and quickly became a sensation. Bakeries like Breads Bakery in New York, Challah Prince in Los Angeles, and countless neighborhood kosher bakeries across North America began offering pretzel challah as a weekly special — and found it outselling their regular challah by wide margins. It became a social media phenomenon, its dramatic dark crust and glistening salt crystals perfectly photogenic.
What makes pretzel challah more than a trend is that it sits comfortably within the halachic framework of challah. The dough meets all requirements for lechem (bread) and HaMotzi. The baking soda bath is simply a surface treatment — it does not change the bread’s fundamental character. You can still perform hafrashat challah, still use it for lechem mishneh, still make HaMotzi. It is innovation in full respect of tradition.
Today, pretzel challah has earned a permanent place alongside classic challah in many Jewish homes. Some families alternate week to week; others reserve pretzel challah for special occasions or when hosting guests who need no persuading that Shabbat dinner is something extraordinary.
Kosher Observance & Halachic Notes
Kosher Classification: Dairy (with butter wash) or Pareve (with egg wash & oil)
The dairy version uses a melted butter wash brushed on after baking, creating a richer, more authentic pretzel finish. The pareve version omits the butter entirely and uses egg wash before the baking soda dip and vegetable oil brushed on after baking. The dough itself is pareve in both versions. If making dairy, clearly mark the challah so it is not accidentally served at a meat meal.
Hafrashat Challah (Separating Challah)
This recipe calls for 500 g of flour. According to most Ashkenazi poskim, this amount requires separating challah without a bracha. If you double the recipe (1,000 g flour), you should separate challah with a bracha. Sephardi practice may differ — consult your community’s minhag.
How to perform Hafrashat Challah:
- After the dough is fully mixed, pinch off a small piece — at least a kezayit (roughly 28 g / 1 oz).
- If the total flour exceeds the bracha threshold for your community, recite the bracha:
Hebrew:
בָּרוּךְ אַתָּה ה’ אֱלֹהֵינוּ מֶלֶךְ הָעוֹלָם אֲשֶׁר קִדְּשָׁנוּ בְּמִצְוֹתָיו וְצִוָּנוּ לְהַפְרִישׁ חַלָּהTransliteration:
Baruch Atah Adonai, Eloheinu Melech ha’olam, asher kid’shanu b’mitzvotav v’tzivanu l’hafrish challah.Translation:
“Blessed are You, Lord our God, King of the universe, Who has sanctified us with His commandments and commanded us to separate challah.”
- Say: “Harei zu challah” (“This is challah”).
- Wrap the separated piece in foil and burn it. It may not be eaten.
Checking Eggs for Blood Spots
Each egg should be cracked individually into a clear glass or small bowl and inspected before adding to the dough. If a blood spot is found, the egg must be discarded entirely.
Pas Yisroel
When a Jewish person sets the oven temperature or contributes to the baking in any way, the pretzel challah fulfills Pas Yisroel requirements. This is particularly relevant during the Aseret Yemei Teshuvah.
Brachot (Blessings)
- Before eating: HaMotzi Lechem Min Ha’Aretz — pretzel challah is bread in every halachic sense. Wash and make HaMotzi.
- After eating: Birkat HaMazon (Grace After Meals).
Ingredients
Challah Dough
| Ingredient | Grams | Volume | Baker’s % |
|---|---|---|---|
| Bread flour (unbleached) | 500 g | 4 cups | 100% |
| Fine sea salt | 9 g | 1½ tsp | 1.8% |
| Granulated sugar | 50 g | ¼ cup | 10% |
| Instant (rapid-rise) yeast | 7 g | 2¼ tsp | 1.4% |
| Large eggs, room temperature (check for blood spots) | 100 g | 2 large eggs | 20% |
| Vegetable oil (or neutral oil) | 60 g | ¼ cup + 1 Tbsp | 12% |
| Warm water (see DDT note below) | 170 g | ¾ cup | 34% |
| Total Dough Weight | ~896 g | — | — |
Baking Soda Bath
| Ingredient | Amount | Notes |
|---|---|---|
| Water | 2.5 L (10 cups) | Use a wide, shallow pot or roasting pan |
| Baking soda (sodium bicarbonate) | 75 g (⅓ cup) | Creates the alkaline environment for pretzel crust |
Topping & Finish
| Option | Amount | Classification |
|---|---|---|
| Coarse pretzel salt or flaky sea salt | 10–15 g (1–2 Tbsp) | Essential — do not skip |
| Dairy: Melted unsalted butter (brushed on after baking) | 30 g (2 Tbsp) | Dairy — serve only with dairy meals |
| Pareve: Vegetable oil (brushed on after baking) | 15 g (1 Tbsp) | Pareve — serve with meat or dairy |
For the pareve version, the entire recipe — dough, bath, and finish — is pareve. No dairy touches the bread at any stage.
Desired Dough Temperature (DDT)
Target DDT: 26°C (78°F)
A moderately warm dough gives the yeast a healthy start without over-fermenting before you braid. To calculate your water temperature:
Water Temp = (DDT × 3) − Flour Temp − Room Temp
Example: If your kitchen is 22°C and your flour is 21°C:
Water = (26 × 3) − 22 − 21 = 35°C (95°F)
The water should feel comfortably warm — like bath water. Never exceed 43°C (110°F).
Step-by-Step Instructions
Step 1: Make the Challah Dough
Crack each egg individually into a clear glass and inspect for blood spots. If clear, add to the bowl of a stand mixer along with the warm water, sugar, and oil. Whisk briefly to combine.
Add the bread flour, salt, and instant yeast (keep salt and yeast on opposite sides). Mix on low speed (speed 1–2) for 2–3 minutes until a shaggy dough forms and no dry flour remains.
Increase to medium speed (speed 3–4) and knead for 8–10 minutes until the dough is:
- Smooth and elastic — it should pull away from the bowl sides cleanly.
- Soft and slightly tacky — but not wet or sticky. It should not cling to dry fingers.
- Passes the windowpane test — stretch a small piece thin enough to see light through it without tearing.
Hand kneading: Combine in a large bowl, turn onto a lightly floured surface, and knead 12–15 minutes. The dough should feel supple, smooth, and alive.
Step 2: First Rise (Bulk Fermentation)
Lightly oil a large bowl. Place the dough inside, turn to coat, and cover tightly with plastic wrap or a damp towel.
Let rise at room temperature for 1 to 1½ hours until doubled in volume. The dough should be puffy and spring back slowly when you press it with a floured finger.
Step 3: Divide and Shape the Strands
Turn the risen dough out onto a lightly floured surface. Gently deflate by pressing with your palms.
Using a bench scraper and scale, divide the dough into 6 equal pieces (~149 g each) for a six-strand braid. Roll each piece into a smooth rope, 35–40 cm (14–16 inches) long, tapering slightly at both ends.
If the dough resists rolling and springs back, cover the strands with a towel and let them rest for 5 minutes, then continue. Relaxed gluten rolls much more easily.
Step 4: Braid the Challah
Six-strand braid:
- Lay the 6 strands side by side. Pinch all strands together at one end and tuck the pinched end underneath.
- Number the strands 1 through 6 from left to right.
- Repeat this sequence: Move strand 6 over strand 1. Move strand 2 over strand 6. Move strand 1 over strand 3. Move strand 5 over strand 1. Move strand 6 over strand 4.
- Continue the pattern until you reach the end. Pinch the ends together and tuck underneath.
Tip: A four-strand braid also works beautifully. The key is a tight, compact braid — loose braids can come apart during the baking soda bath. Press the strands firmly together at both ends.
Place the braided challah on a parchment-lined baking sheet.
Step 5: Second Rise (Proofing)
Cover the braided challah loosely with lightly oiled plastic wrap or a damp towel. Let rise at room temperature for 30–45 minutes until the loaf is puffy but not fully doubled.
Do not over-proof. The challah will get one final boost of oven spring during baking. A slightly under-proofed loaf also holds up better during the baking soda bath. The braid should look pillowy and expanded, but still hold its shape firmly when the sheet is gently jiggled.
During this rise, preheat your oven to 190°C (375°F) with a rack in the center position.
Step 6: Prepare the Baking Soda Bath
This is the step that transforms challah into pretzel challah.
In a wide, shallow pot or deep roasting pan (large enough to hold the braided challah), bring 2.5 L (10 cups) of water to a rolling boil.
Carefully add the 75 g (⅓ cup) baking soda. The water will foam vigorously — this is normal. Stir to dissolve, then reduce heat to a gentle simmer.
Why baking soda, not lye? Traditional Bavarian pretzels use food-grade lye (sodium hydroxide) for a more intense crust. Baking soda (sodium bicarbonate) is a safer, more accessible alternative that produces an excellent pretzel crust — slightly less dramatic than lye but still deeply colored and distinctly pretzel-flavored. For home baking, baking soda is the standard and recommended approach.
Safety note: The baking soda solution is mildly alkaline. Avoid splashing. Use a large slotted spatula or spider skimmer to handle the challah.
Step 7: Dip the Challah in the Baking Soda Bath
This step requires confidence and a gentle hand. The braided challah is delicate but stronger than you think.
- Slide the challah off the parchment and gently lower it into the simmering baking soda bath using two large slotted spatulas (or your hands if you are confident — the water should be at a gentle simmer, not a roaring boil).
- Let it sit in the bath for 30 seconds per side. Use the spatulas to carefully flip it once. Total bath time: approximately 60 seconds.
- Lift the challah out with the spatulas, letting excess water drain for a few seconds, and return it to the parchment-lined baking sheet.
The challah will look slightly deflated and wet. This is completely normal. It will puff back up dramatically in the oven.
Step 8: Top with Coarse Salt & Bake
Immediately after the bath, while the surface is still wet, sprinkle coarse pretzel salt or flaky sea salt generously over the top and sides of the challah. The wet, alkaline surface acts as glue — the salt will adhere perfectly.
Place the challah in the preheated oven. Bake at 190°C (375°F) for 28–33 minutes until:
- The crust is a deep, dark mahogany brown — much darker than a regular challah. Do not be alarmed; this is the desired pretzel color.
- The internal temperature reads 88–93°C (190–200°F) on an instant-read thermometer.
- The bottom sounds hollow when tapped.
Do not under-bake. The dark crust is normal and desirable. If the top is browning too quickly while the inside is still raw, tent loosely with aluminum foil for the last 10 minutes.
Step 9: Butter Wash & Cool
Remove the challah from the oven and immediately brush the top and sides with melted butter (dairy version) or vegetable oil (pareve version). This adds shine, flavor, and softens the crust slightly — bringing it closer to a soft pretzel’s texture.
Let the challah cool on a wire rack for at least 20 minutes before slicing or tearing. The interior needs time to set; cutting too early will result in a gummy crumb.
Storage & Reheating
- Same day: Pretzel challah is at its absolute best within a few hours of baking, when the crust is still slightly chewy and the salt crystals are at peak crunch.
- Room temperature: Wrap tightly in plastic wrap or store in a sealed bag at room temperature for up to 2 days. The pretzel crust will soften over time but the flavor remains excellent.
- Reheating: Wrap loosely in foil and warm in a 165°C (325°F) oven for 8–10 minutes to partially restore the crust. Do not microwave — it will make the bread gummy and destroy the pretzel crust texture.
- Freezing: Wrap cooled challah tightly in plastic wrap, then foil. Freeze for up to 2 months. Thaw at room temperature for 2–3 hours, then reheat in foil in the oven.
- Make ahead: The dough can be prepared through Step 2 (first rise), punched down, wrapped tightly, and refrigerated for up to 24 hours. Remove from the fridge, let warm for 30 minutes, then continue with shaping.
Troubleshooting Guide
| Problem | Likely Cause | Solution |
|---|---|---|
| Crust is pale, not dark brown | Not enough baking soda in the bath; bath time too short; oven temperature too low | Use the full ⅓ cup baking soda. Ensure 30 seconds per side in the bath. Verify oven temperature with a thermometer — bake at a true 190°C (375°F). |
| Braid fell apart in the bath | Braid was too loose; dough was over-proofed; water was at a hard boil | Braid tightly and pinch ends securely. Slightly under-proof before the bath. Reduce water to a gentle simmer before dipping. |
| Salt fell off during baking | Surface dried before salt was applied; salt grains too small | Apply salt immediately after removing from the bath while surface is still wet. Use coarse pretzel salt or large flaky sea salt, not fine table salt. |
| Interior is gummy or underbaked | Removed from oven too early; cut while still hot | Bake until internal temperature reaches 88–93°C (190–200°F). Let cool at least 20 minutes before cutting. The dark crust is normal — do not pull it early. |
| Challah tastes too salty | Too much salt applied; used fine salt instead of coarse | Use coarse pretzel salt sparingly — 10–15 g is enough. Coarse salt gives bursts of flavor; fine salt over-seasons the entire surface. |
| Crust is too hard or thick | Overbaked; no butter/oil brushed on after baking | Do not exceed 33 minutes. Brush with melted butter or oil immediately after removing from oven — this softens the crust to a pretzel-like chew. |
Frequently Asked Questions
What is pretzel challah?
Pretzel challah is a traditional braided challah dough that is dipped in a boiling baking soda (or lye) bath before baking — the same technique used to make soft pretzels and Bavarian pretzels. The alkaline bath triggers a Maillard reaction on the surface, producing a deep mahogany-brown crust with a distinctive, slightly tangy pretzel flavor. The interior remains classic challah: soft, golden, and egg-enriched. Topped with coarse salt, it combines the best of both breads into one stunning loaf.
Can I use lye instead of baking soda for a more authentic pretzel crust?
Yes, food-grade lye (sodium hydroxide) produces a darker, more intensely flavored pretzel crust than baking soda. If using lye, dissolve 25 g food-grade lye in 1 L cold water (always add lye to water, never the reverse). Dip the challah for 15–30 seconds, not longer. Wear gloves and eye protection when handling lye solution, and use only food-grade lye from a reputable supplier. For most home bakers, baking soda produces excellent results and is far easier and safer to work with.
Is pretzel challah pareve or dairy?
The dough itself is pareve in all versions of this recipe — it contains no dairy ingredients. What determines the final classification is the finish: brushing with melted butter after baking makes it dairy; brushing with vegetable oil keeps it pareve. The baking soda bath is pareve. If you need a pareve challah for a meat meal, simply use the oil finish and the entire bread is pareve. Always label clearly if you make a dairy version.
Can I make pretzel challah rolls instead of a large loaf?
Absolutely. Divide the dough into 8–10 pieces (about 90–112 g each). Shape each piece into a round roll or tie into a simple knot. Dip each roll in the baking soda bath for 15–20 seconds per side. Top with coarse salt and bake at 190°C (375°F) for 18–22 minutes. Rolls are ideal for individual Shabbat portions or for sandwiches. Reduce baking time and watch closely — smaller pieces brown faster.
Why is my pretzel challah not as dark as the ones I see in bakeries?
Professional bakeries almost always use food-grade lye rather than baking soda, which produces a significantly darker, more dramatic crust. If you are using baking soda and want a darker result, try these adjustments: increase the baking soda to 100 g per 2.5 L water, extend the bath time to 45 seconds per side, and make sure your oven is at a true 190°C (use an oven thermometer). The baking soda version will be a rich brown — beautiful and delicious — but not quite as dark as the lye version. Both taste wonderful.
Ready to Twist Tradition?
Pretzel challah turns heads at every Shabbat table. That dark, salted crust and soft interior — once you bake it, you will never look at plain challah quite the same way again.
Save This Recipe
Master Classic Challah First →
Have questions? Tag us @kosherbreadpro on Instagram or leave a comment below. We answer every one.