


Dairy-Free • Egg • Contains Gluten
2 challahs
Intermediate
45 minutes
3–4 hours
HaMotzi
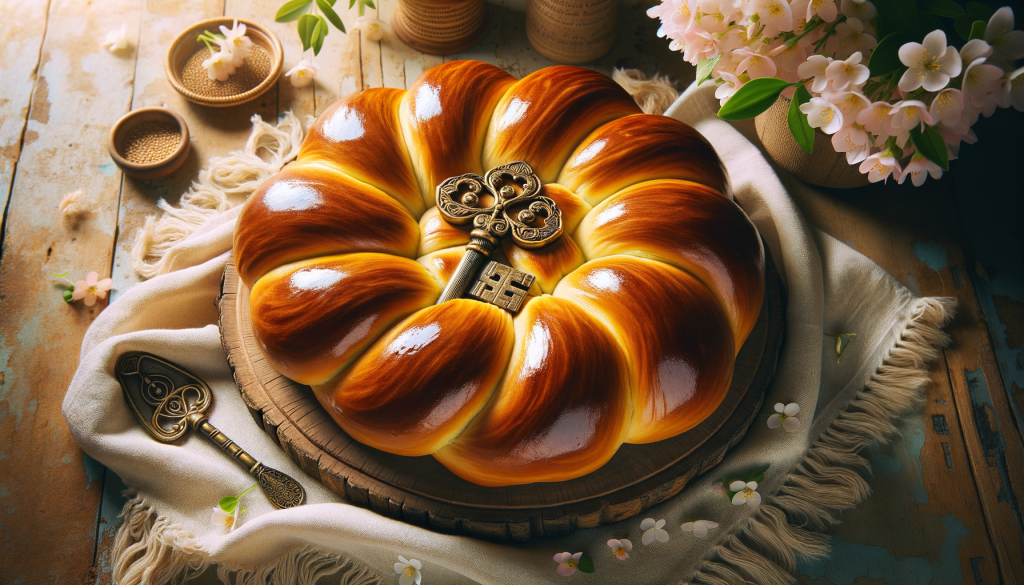
Shlissel challah is the first challah you bake after Pesach — and it carries the weight of an entire week of longing. For eight days you have eaten matzah: flat, humble, the bread of affliction and of freedom. And now, on the first Shabbat after the holiday ends, you return to chametz. You return to yeast, to rising dough, to the golden braided loaf that anchors the Jewish table. But this is no ordinary challah. This one is shaped like a key, or bears a key pressed into its surface, or hides a key wrapped in foil inside its braids. This is shlissel challah — the key challah — and it is baked as a segulah (spiritual remedy) for parnassah, for livelihood and sustenance.
The word shlissel comes from the Yiddish shlisl (שליסל), meaning “key.” The tradition holds that on the Shabbat immediately following Pesach, the gates of heaven that were opened during the holiday begin to close. By baking a challah in the shape of a key — or with a key — we symbolically ask that the gates of parnassah remain open for us and for our families. It is a prayer you can hold in your hands, a petition baked in dough.
There is something deeply moving about this minhag. After a week without bread, the first challah you bake is not just for Shabbat — it is an act of faith. You are saying: I trust that sustenance will come. I am opening the door. And so you shape the dough into a key and place it in the oven, and you wait for it to rise.
Shlissel challah is baked on the first Shabbat after Pesach. In 2026, Pesach ends on Saturday evening, April 11, making the shlissel challah Shabbat on April 17–18. Mark your calendar — this is a once-a-year bake.
What Makes This Shlissel Challah Special
Shlissel challah is a once-a-year tradition that transforms ordinary challah baking into something spiritually charged and deeply symbolic:
- Key-shape symbolism — the key represents opening the gates of heaven for parnassah (livelihood). Whether you shape the dough itself into a key, press a key into the top, or braid a foil-wrapped key inside, every method carries the same intention and prayer.
- The first challah after Pesach — after eight days without chametz, this is your triumphant return to bread-baking. The dough feels different in your hands after a week away. The aroma of yeast is intoxicating. This challah marks the transition from Pesach back to the rhythm of ordinary Shabbat.
- A segulah for parnassah — the tradition holds that baking shlissel challah with the proper kavanah (intention) is a spiritual merit for financial sustenance. Many families have upheld this minhag for generations, passing it from mother to daughter.
- Three shaping techniques — we provide detailed instructions for all three traditional methods: shaping the dough itself into a key form, pressing or stamping a clean key into the top of the challah, and braiding a foil-wrapped key inside the loaf. Choose the method that speaks to you.
- Rich, golden challah dough — the base recipe is a classic, egg-enriched challah with oil, delivering a soft, pillowy crumb and beautiful golden crust. This is the same beloved challah elevated by a once-a-year purpose.
The Story of Shlissel Challah: Origins, Meaning & Debate
The minhag (custom) of baking shlissel challah is most commonly traced to the Chassidic communities of Eastern Europe, particularly from the 18th and 19th centuries. The earliest known references appear in Chassidic writings, where the key is connected to the verse in Tehillim (Psalms 118:19): “Pitchu li sha’arei tzedek” — “Open for me the gates of righteousness.” The Shabbat after Pesach, known as the first “regular” Shabbat of the new season, became a natural moment for this prayer to take physical form.
Several explanations are offered for the timing. One tradition holds that the sha’arei shamayim (gates of heaven) are opened during Pesach — when Hashem pours out abundance for the Jewish people — and begin to close after the holiday. The key-shaped challah is a symbolic request that those gates remain open. Another explanation connects shlissel challah to the manna: the Midrash teaches that the jar of manna that Bnei Yisrael carried through the desert ceased to fall after they entered Eretz Yisrael and ate from the produce of the land for the first time — which occurred during Pesach. The first Shabbat after Pesach, then, marks the moment when sustenance shifted from miraculous to natural, and we ask Hashem to continue providing.
The minhag has spread far beyond Chassidic circles and is now observed by families across the Ashkenazi world and increasingly among Sephardi communities as well. It appears in community cookbooks, synagogue newsletters, and social media every spring.
A note of balance: Not all poskim endorse this practice. Some authorities, including certain Lithuanian (Litvish) rabbis, have questioned whether shlissel challah has a solid Torah or halachic basis, noting that segulot should not substitute for tefillah (prayer) and bitachon (trust in Hashem). Others have raised concerns about the custom’s origins. These are sincere halachic opinions deserving of respect. Many families who bake shlissel challah view it not as a substitute for prayer or effort, but as a beautiful physical expression alongside their tefillos — a way to bring kavanah into the kitchen. As with all minhagim, follow the guidance of your own rav and community tradition.
Kosher Observance & Halachic Notes
Kosher Classification: Pareve
This shlissel challah recipe uses vegetable oil (no butter or dairy), making it fully pareve. It may be served at both meat and dairy Shabbat meals.
Hafrashat Challah (Separating Challah)
This recipe calls for 600 g of flour, which yields two challahs. According to most Ashkenazi poskim, this amount requires separating challah with a bracha. Sephardi practice may differ — consult your community’s minhag.
How to perform Hafrashat Challah:
- After the dough is fully mixed, pinch off a small piece — at least a kezayit (roughly 28 g / 1 oz).
- Recite the bracha:
Hebrew:
בָּרוּךְ אַתָּה ה’ אֱלֹהֵינוּ מֶלֶךְ הָעוֹלָם אֲשֶׁר קִדְּשָׁנוּ בְּמִצְוֹתָיו וְצִוָּנוּ לְהַפְרִישׁ חַלָּהTransliteration:
Baruch Atah Adonai, Eloheinu Melech ha’olam, asher kid’shanu b’mitzvotav v’tzivanu l’hafrish challah.Translation:
“Blessed are You, Lord our God, King of the universe, Who has sanctified us with His commandments and commanded us to separate challah.”
- Say: “Harei zu challah” (“This is challah”).
- Wrap the separated piece in foil and burn it. It may not be eaten.
Timing: First Shabbat After Pesach
Shlissel challah is baked specifically for the first Shabbat after Pesach ends. It is not baked on other weeks of the year. Since Pesach chametz restrictions end at nightfall on the final day of the holiday, most families bake their shlissel challah on Thursday or Friday of that week. Ensure that all your utensils, bowls, and pans have been returned from Pesach storage to regular chametz use before beginning.
Checking Eggs for Blood Spots
Each egg should be cracked individually into a clear glass or small bowl and inspected before adding to the dough. If a blood spot is found, the egg must be discarded entirely.
Pas Yisroel
When a Jewish person lights the oven or contributes to the baking in any way, the challah fulfills Pas Yisroel requirements. This is particularly relevant during the Aseret Yemei Teshuvah, though shlissel challah is baked in the spring.
Brachot (Blessings)
- Before eating: HaMotzi Lechem Min Ha’Aretz — wash hands and make HaMotzi as with any challah.
- After eating: Birkat HaMazon (Grace After Meals).
If Using a Real Key Inside the Challah
If you bake a real key inside the loaf, it must be thoroughly cleaned and wrapped completely in aluminum foil so that it does not come into direct contact with the dough. Some families prefer to use a new, unused key. Others use a decorative key reserved specifically for this purpose each year.
Ingredients
Challah Dough
| Ingredient | Grams | Volume | Baker’s % |
|---|---|---|---|
| Bread flour (or all-purpose, unbleached) | 600 g | 4¾ cups | 100% |
| Fine sea salt | 10 g | 1¾ tsp | 1.7% |
| Granulated sugar | 75 g | 6 Tbsp | 12.5% |
| Instant (rapid-rise) yeast | 9 g | 2¼ tsp | 1.5% |
| Large eggs, room temperature (check for blood spots) | 150 g | 3 large eggs | 25% |
| Vegetable oil (canola or sunflower) | 80 g | ⅓ cup + 1 Tbsp | 13.3% |
| Warm water (see DDT note below) | 180 g | ¾ cup | 30% |
| Total Dough Weight | ~1,104 g | — | — |
Egg Wash
| Ingredient | Amount |
|---|---|
| Large egg (check for blood spots) | 1 |
| Water | 1 tsp |
Optional Toppings
- Sesame seeds, poppy seeds, or everything-bagel seasoning
- Coarse sea salt flakes (for a salted finish)
For Key Shaping (choose one method)
- Method A — Key-shaped challah: No extra materials needed; you will shape the dough itself into a key form.
- Method B — Key pressed into top: A large, clean decorative key (metal, thoroughly washed).
- Method C — Key baked inside: A clean key wrapped completely in aluminum foil.
Equipment
- Stand mixer with dough hook (or large bowl for hand kneading)
- Kitchen scale
- 2 baking sheets lined with parchment paper
- Pastry brush (for egg wash)
- Bench scraper
- Clear glass or small bowl for egg checking
- Plastic wrap or damp towel
- Aluminum foil (if baking a key inside)
Desired Dough Temperature (DDT)
Target DDT: 26°C (78°F)
A properly warm dough ensures even fermentation and a good rise. To calculate your water temperature:
Water Temp = (DDT × 3) − Flour Temp − Room Temp
Example: If your kitchen is 22°C and your flour is 21°C:
Water = (26 × 3) − 22 − 21 = 35°C (95°F)
The water should feel comfortably warm — like bath water. Never exceed 43°C (110°F), which can kill the yeast.
Step-by-Step Instructions
Step 1: Make the Dough
Crack each egg individually into a clear glass and inspect for blood spots. If clear, add to the bowl of a stand mixer along with the warm water, sugar, and oil. Whisk briefly to combine.
Add the flour, salt, and instant yeast (keep salt and yeast on opposite sides of the bowl). Mix on low speed (speed 1–2) for 2–3 minutes until a shaggy dough forms and no dry flour remains.
Increase to medium speed (speed 3–4) and knead for 8–10 minutes until the dough is:
- Smooth and elastic — it should pull away from the bowl sides cleanly.
- Soft and slightly tacky — but not wet or sticky. It should not cling to dry fingers when touched briefly.
- Passes a windowpane test — stretch a small piece thin; it should become translucent before tearing.
Hand kneading: Combine ingredients in a large bowl, turn onto a lightly oiled surface, and knead 12–15 minutes. Challah dough is enriched and takes longer to develop gluten by hand.
Perform hafrashat challah now (see Halachic Notes above).
Step 2: First Rise
Lightly oil a large bowl. Place the dough inside, turn to coat, and cover tightly with plastic wrap or a damp towel.
Let rise at room temperature for 1 to 1.5 hours until doubled in volume. The dough should be puffy and spring back slowly when pressed with a floured finger.
Step 3: Divide the Dough
Gently turn the risen dough onto a lightly oiled surface and deflate. Using a bench scraper and scale, divide the dough into 2 equal pieces (~550 g each) for two challahs.
Now choose your shaping method. You may use the same method for both loaves or try different methods.
Step 4: Shape the Challah — Three Methods
Method A: Key-Shaped Challah (dough formed into a key)
This is the most dramatic and visual approach. The challah itself looks like a large key.
- Take one portion of dough (~550 g). Pinch off about 100 g and set aside for the key “teeth.”
- Divide the remaining ~450 g into 3 equal strands (~150 g each). Roll each strand into a rope about 40 cm (16 inches) long.
- Braid the three strands into a classic three-braid challah, pinching the ends together. This forms the “shaft” of the key.
- At one end, curve the braid into a round loop — the “bow” (head) of the key. Pinch the end securely to the body of the braid to seal the loop. The loop should be roughly 8–10 cm (3–4 inches) in diameter.
- With the reserved 100 g of dough, form 2–3 small rectangular “teeth” at the opposite (straight) end. Roll small pieces into short strips about 5–6 cm (2 inches) long and attach them perpendicular to the shaft, pressing firmly to adhere. Dab a little water at the attachment points if needed.
- Transfer carefully to a parchment-lined baking sheet.
Method B: Key Pressed Into the Top
The simplest method. You bake a traditional braided challah and press a decorative key into the top before baking.
- Divide the ~550 g portion into 3 or 4 strands and braid into a classic challah shape. Pinch and tuck the ends underneath.
- Place on a parchment-lined baking sheet.
- After the second rise (Step 5) and after applying egg wash, press a clean, large key firmly into the top of the challah so it is partially embedded in the dough. The key will remain visible on the surface as the challah bakes, leaving a permanent impression.
- Remove the key after baking (it will lift out easily). The key imprint will remain beautifully visible on the golden crust.
Method C: Traditional Braid with Key Baked Inside
The key is hidden inside the challah — a surprise revealed only when you slice or tear the bread at the Shabbat table.
- Wrap a clean key thoroughly in aluminum foil — at least two layers, ensuring no metal is exposed. The foil prevents the key from touching the dough directly.
- Divide the ~550 g portion into 3 or 4 strands and begin braiding.
- About halfway through the braid, tuck the foil-wrapped key into the center of the dough, nestling it between the strands. Continue braiding over and around it so the key is fully enclosed.
- Pinch and tuck the ends. Transfer to a parchment-lined baking sheet.
- Important: Warn your family that there is a key inside before serving, so no one bites into it unexpectedly.
Step 5: Second Rise
Cover the shaped challahs loosely with plastic wrap or a damp towel. Let rise for 45 minutes to 1 hour in a warm place until the loaves are visibly puffy and have increased in size by about 50%. They should feel light and airy when you gently nudge the baking sheet.
While the challahs rise, preheat your oven to 180°C (350°F) with a rack in the center position.
Step 6: Egg Wash
Beat the egg wash egg with 1 tsp water. Using a pastry brush, apply a thin, even coat over the entire surface of each challah, getting into the crevices of the braid. Be gentle — do not deflate the risen dough.
If using Method B (key pressed into top), press the key into the challah now, after the egg wash.
Sprinkle with sesame seeds, poppy seeds, or your preferred topping if desired.
Step 7: Bake
Place the challahs in the preheated oven and bake for 25–30 minutes until:
- The crust is deep golden brown — a rich, burnished color, not pale.
- The bottom sounds hollow when tapped.
- The internal temperature reads 88–93°C (190–200°F) on an instant-read thermometer.
Key-shaped challah (Method A): The thinner “teeth” at the end of the key may brown faster. If they darken too quickly, tent loosely with a small piece of foil for the last 10 minutes.
Remove from the oven and let cool on a wire rack for at least 20 minutes before serving. If using Method B, carefully remove the key from the top while the challah is still warm.
Storage & Make-Ahead
- Room temperature: Wrap cooled challah tightly in plastic wrap or place in an airtight bag. Keeps well for 2–3 days at room temperature.
- Freezing: Wrap cooled challah in plastic wrap, then a layer of aluminum foil. Freeze for up to 2 months. Thaw at room temperature for 2–3 hours, then refresh in a 150°C (300°F) oven for 8–10 minutes.
- Make-ahead option: Shape the challahs, place on baking sheets, cover tightly with plastic wrap, and refrigerate overnight (up to 12 hours). Remove from the fridge 45–60 minutes before baking to let them come to room temperature and finish rising, then egg wash and bake as directed.
- Day-old challah: Makes outstanding French toast, challah bread pudding, or croutons for soup.
Troubleshooting Guide
| Problem | Likely Cause | Solution |
|---|---|---|
| Key shape lost during baking | Dough over-proofed and spread; key teeth not attached firmly | Do not over-proof — bake when loaves are puffy but still holding their shape. Use water to glue the teeth to the shaft. Chill shaped challah for 15 minutes before baking if shape is soft. |
| Challah is pale and soft on top | Insufficient egg wash; oven temperature too low | Apply egg wash evenly and thoroughly. Verify oven temperature with a thermometer. A second light coat of egg wash after 5 minutes in the oven can boost color. |
| Dough is sticky and hard to braid | Too much water; humidity; under-kneaded | Add flour 1 Tbsp at a time during kneading until dough pulls away from bowl sides. Oil your hands lightly when shaping. Ensure full 8–10 minute knead. |
| Braid unraveled during baking | Strands not pinched tightly; under-proofed dough fighting the shape | Pinch strand ends very firmly and tuck them underneath the loaf. Allow a full second rise so the dough relaxes into its shape before the oven spring. |
| Challah is dense or heavy | Yeast was old or killed by hot water; insufficient rise time | Test yeast in warm water with a pinch of sugar before adding to dough — it should foam within 10 minutes. Allow full doubling in first rise. Water must not exceed 43°C (110°F). |
| Key impression (Method B) disappeared | Key not pressed deep enough; too much oven spring | Press the key firmly — at least halfway into the dough. Use a heavy, large key for a more dramatic impression. Leave the key in place during baking for the deepest mark. |
Frequently Asked Questions
What does “shlissel” mean?
Shlissel (שליסל) is the Yiddish word for “key,” derived from the German Schlüssel. Shlissel challah literally means “key challah.” The key symbolizes our prayer that Hashem open the gates of parnassah (livelihood) and sustenance for us and our families. The physical act of shaping bread into a key — or baking a key inside — transforms an abstract prayer into something tangible, something you can hold and share at your Shabbat table.
Is shlissel challah halacha or minhag?
Shlissel challah is a minhag (custom), not a halachic obligation. It is not mentioned in the Shulchan Aruch or in the Talmud. The practice is rooted primarily in Chassidic tradition and has spread widely through Ashkenazi communities over the past two centuries. Some poskim and rabbinical authorities have expressed reservations about the practice, questioning its origins and cautioning that segulot should complement — not replace — sincere tefillah (prayer), hishtadlut (effort), and bitachon (trust in Hashem). Many families who observe this minhag view it as a beautiful, meaningful expression of faith alongside their prayers, not as a substitute. Follow your own rav’s guidance and your family’s tradition.
When exactly is shlissel challah baked?
Shlissel challah is baked for the first Shabbat after Pesach ends. Since Pesach ends at nightfall (after Havdalah on the final day of the holiday outside of Israel), you would bake your shlissel challah during the week following Pesach — typically on Thursday or Friday — for that upcoming Shabbat. It is a once-a-year tradition. Some communities also have a custom of baking shlissel challah for the second Shabbat after Pesach, but the primary and most widely observed practice is the first Shabbat only.
Which shaping method is “most correct”?
All three methods are equally valid and widely practiced. Shaping the dough into a key form (Method A) is the most visually striking and is especially popular on social media and in bakeries. Pressing a key into the top (Method B) is the simplest and most accessible method, ideal for beginners. Baking a key inside the challah (Method C) is perhaps the most traditional Chassidic approach — the key is hidden, like the hidden blessings we pray for. Choose the method that resonates with you, or try a different one each year.
Can I use my regular challah recipe for shlissel challah?
Absolutely. Shlissel challah is not about a specific dough recipe — it is about the shaping, the timing, and the kavanah (intention). Any challah dough you love can become shlissel challah. The recipe we provide here is a classic, reliable egg challah that shapes beautifully, but if you have a family recipe you prefer — whether it is a honey challah, a whole wheat challah, or a water challah — use it with confidence. The key is the key.
Open the Gates of Parnassah at Your Shabbat Table
Shlissel challah is a once-a-year opportunity to turn your baking into a prayer. Shape the key. Open the door. Welcome the blessing.
Save This Recipe
Classic Kosher Challah →
Honey Challah →
Have questions? Tag us @kosherbreadpro on Instagram or leave a comment below. We answer every one.