


Dairy-Free • Egg • Contains Gluten • No Commercial Yeast
2 large loaves
Advanced
1 hour
18–24 hours
HaMotzi
This sourdough challah recipe recreates the bread your great-great-grandmother made — before commercial yeast existed.
For thousands of years, every loaf of bread that rose on a Jewish table did so without a single packet of instant yeast. There was only flour, water, wild fermentation, and time. The sourdough starter — a living culture of wild yeast and beneficial bacteria, sustained by nothing more than regular feedings of flour and water — was the original leavening. It was the engine behind every challah pulled from a wood-fired oven in Vilna, in Kraków, in the shtetls of the Pale of Settlement. This is not a modern twist on an old recipe. This is the old recipe. Everything else came later.
What you will discover here is a challah unlike anything commercial yeast can produce. The crumb is open and tender, laced with a complex tang that plays against the sweetness of honey in a way that is deeply, unmistakably alive. The crust bakes to a deep caramel brown with a fragrance that fills the entire house — warm, wheaty, faintly acidic, ancient. It demands patience. It rewards attention. And when you pull these braided loaves from the oven on a Friday afternoon, you are not just baking bread. You are reaching back through centuries of Jewish baking tradition and carrying it forward with your own hands.
Advanced bakers, this is your summit. If you have mastered our Classic Challah, you are ready. If you have not, start there first — then come back here when you are ready to climb.
What Makes Sourdough Challah Different
This is not a yeasted challah with a spoonful of starter stirred in for flavor. This is a 100% naturally leavened challah — no commercial yeast of any kind. The entire rise comes from your sourdough levain, and that changes everything:
- Complex flavor — wild fermentation produces hundreds of aromatic compounds that instant yeast cannot. You will taste subtle tang, floral notes, and a depth of wheat flavor that no quick-rise recipe can touch.
- Superior texture — the slow fermentation strengthens the gluten network over hours, producing an open, tender crumb with a delicate, pull-apart quality.
- Longer shelf life — the organic acids produced during sourdough fermentation naturally retard staling. This challah stays soft and moist for days.
- Extended timeline — where yeasted challah takes 4–5 hours from start to finish, sourdough challah takes 18–24 hours. The bread sets the schedule; you do not.
- Controllable tang — you decide how sour or mild the challah tastes by adjusting your levain consistency and fermentation time (details below).
Kosher Observance & Halachic Notes
Kosher Classification: Pareve
This recipe uses vegetable oil (not butter) and contains no dairy ingredients, making it fully pareve. It may be served alongside both meat and dairy Shabbat meals.
Sourdough Starter: Inherently Kosher
A sourdough starter is nothing more than flour and water that has been colonized by wild yeast and lactobacilli through natural fermentation. There are no non-kosher ingredients or processes involved in creating or maintaining a starter. The wild yeast (Saccharomyces species) and bacteria (Lactobacillus species) are naturally occurring organisms present in flour and the surrounding environment. A sourdough starter requires no hechsher — it is as kosher as the flour and water from which it is made.
Sourdough: The Original Jewish Leavening
Long before Fleischmann’s marketed the first commercial yeast cake in 1868, Jewish bakers relied exclusively on sourdough cultures to leaven their bread. The practice of maintaining a se’or (sourdough leaven) is referenced in the Torah itself — it is the very substance from which we are commanded to abstain during Pesach, precisely because it was the everyday leavening agent throughout the rest of the year. When you bake with sourdough, you are participating in the most ancient and authentic form of Jewish bread-making.
Hafrashat Challah (Separating Challah) — With a Bracha
This recipe calls for 1,000 g of flour in the final dough plus an additional 100 g in the levain build, for a total of 1,100 g. This exceeds the minimum shiur requiring challah separation with a bracha according to all major poskim.
How to perform Hafrashat Challah:
- After the dough has been fully mixed and combined (before or after bulk fermentation), pinch off a small piece of dough — at least the size of a kezayit (roughly 28 g / 1 oz).
- Hold the piece of dough and recite the bracha:
Hebrew:
בָּרוּךְ אַתָּה ה’ אֱלֹהֵינוּ מֶלֶךְ הָעוֹלָם אֲשֶׁר קִדְּשָׁנוּ בְּמִצְוֹתָיו וְצִוָּנוּ לְהַפְרִישׁ חַלָּהTransliteration:
Baruch Atah Adonai, Eloheinu Melech ha’olam, asher kid’shanu b’mitzvotav v’tzivanu l’hafrish challah.Translation:
“Blessed are You, Lord our God, King of the universe, Who has sanctified us with His commandments and commanded us to separate challah.”
- After reciting the bracha, say: “Harei zu challah” (— “This is challah”).
- The separated piece should be wrapped in foil and burned (e.g., in the oven or on the stovetop). It may not be eaten.
Checking Eggs for Blood Spots
Each egg should be cracked individually into a clear glass or small bowl and visually inspected before adding it to the dough. If a blood spot is found, that egg must be discarded entirely. This applies to all eggs used in the dough and the egg wash.
A Note on Yoshon Flour
For those who observe Yoshon (using only flour milled from grain planted before Pesach of the previous year), verify your flour’s Yoshon status. This applies to both the flour used in the final dough and the flour used to maintain and build your sourdough starter. In North America, winter wheat flours are generally Yoshon, but spring wheat varieties may not be. Check with resources such as the Guide to Chodosh by Rabbi Yosef Herman for current-year information.
Brachot (Blessings)
- Before eating: HaMotzi Lechem Min Ha’Aretz — the standard blessing over bread.
- After eating: Birkat HaMazon (Grace After Meals).
Shabbat Significance: Lechem Mishneh
On Shabbat and Yom Tov, we place two whole loaves (lechem mishneh) on the table, covered with a cloth, to recall the double portion of manna. This recipe yields two loaves — exactly what you need.
Controlling Sourness: The Baker’s Lever
Sourdough challah should taste like challah first — sweet, rich, eggy — with a subtle, complex tang in the background. You control the sourness through two primary levers:
1. Levain Hydration (Stiffness)
- Stiffer levain (60–80% hydration): Favors yeast activity over bacterial acid production. Produces a milder, sweeter flavor. Best for challah where sweetness should dominate.
- Liquid levain (100%+ hydration): Favors lactic and acetic acid production. Produces a tangier, more assertive sourdough flavor. This recipe uses 100% hydration as a balanced starting point.
2. Fermentation Time and Temperature
- Shorter bulk fermentation at warmer temperatures (75–80°F): Less acid accumulation. Milder flavor.
- Longer fermentation or cold retard (fridge overnight): More acid accumulation. Tangier flavor.
Our recommendation for challah: Use the 100% hydration levain specified below, and do a room-temperature bulk fermentation of 4–5 hours. This produces the ideal balance — enough tang to distinguish it as sourdough, enough sweetness from the honey and eggs to make it unmistakably challah. If you want it even milder, reduce the levain hydration to 75% (use 75 g water instead of 100 g in the levain build) and keep bulk fermentation on the shorter side.
Sourdough Starter: Care & Maintenance
Before you begin this recipe, you need an active, mature sourdough starter — one that reliably doubles in volume within 4–6 hours of feeding. If you do not yet have one, you will need about 7–10 days to build one from scratch. Here is a brief guide.
Starting from Scratch
- Day 1: Mix 50 g whole wheat or rye flour with 50 g lukewarm water in a clean glass jar. Cover loosely. Leave at room temperature (70–78°F / 21–26°C).
- Days 2–5: Every 24 hours, discard all but 25 g of the mixture. Add 50 g bread flour and 50 g water. Stir well, cover loosely. You should begin to see bubbles by day 3–4.
- Days 6–10: Once the starter begins rising and falling predictably, switch to twice-daily feedings: discard all but 25 g, add 50 g bread flour and 50 g water every 12 hours. The starter is ready when it reliably doubles within 4–6 hours of feeding and smells pleasantly tangy and yeasty — never like nail polish remover or rotten fruit.
Ongoing Feeding Schedule
- If baking weekly: Keep the starter in the refrigerator. Feed it once a week by discarding all but 25 g and adding 50 g flour + 50 g water. Let it sit at room temperature for 2 hours, then return to the fridge. The night before baking day, pull it out and give it 2–3 feeds at room temperature every 8–12 hours to wake it up.
- If baking frequently (2–3 times per week): Keep it at room temperature and feed 1:2:2 (starter:flour:water by weight) every 12 hours.
Feeding Ratio Explained
The ratio 1:2:2 means: 1 part starter, 2 parts flour, 2 parts water (by weight). Example: 25 g starter + 50 g flour + 50 g water. For a more vigorous rise and milder flavor, use 1:5:5 (25 g starter + 125 g flour + 125 g water) — this dilutes the acid more and gives the yeast a longer runway.
Reviving a Neglected Starter
If your starter has been in the fridge for weeks (or even months) and has developed a dark liquid on top (called hooch — harmless alcohol produced by hungry yeast), it can almost certainly be revived:
- Pour off the hooch.
- Discard all but 25 g of the starter.
- Feed with 50 g flour + 50 g water. Let sit at room temperature.
- Repeat every 12 hours for 2–3 days. By the second or third day, you should see vigorous rising activity. It takes 3–5 feedings to bring a dormant starter back to full strength.
The test that matters: Your starter is ready to bake with when it passes the float test — drop a small spoonful into a glass of room-temperature water. If it floats, the starter is active and sufficiently aerated to leaven bread. If it sinks, give it one more feeding and test again at peak rise.
Ingredients
Part 1: Levain Build (Make 8–12 Hours Before Mixing)
| Ingredient | Grams | Volume | Baker’s % |
|---|---|---|---|
| Ripe sourdough starter (active, just past peak) | 20 g | 1 Tbsp | 20% (of levain flour) |
| Bread flour (unbleached) | 100 g | ¾ cup | 100% |
| Water (room temperature) | 100 g | ~7 Tbsp | 100% |
| Total Levain Weight | ~220 g | — | — |
Levain hydration: 100% (equal parts flour and water by weight). This is a balanced hydration that produces moderate tang and reliable yeast activity.
Part 2: Final Dough
| Ingredient | Grams | Volume | Baker’s % |
|---|---|---|---|
| Bread flour (unbleached, 12–13% protein) | 1,000 g | 7½ cups + 2 Tbsp | 100% |
| Ripe levain (from build above) | 200 g | ~¾ cup | 20% |
| Honey (raw, mild-flavored) | 150 g | ~½ cup | 15% |
| Large eggs, room temperature (check each for blood spots) | 250 g | 5 large eggs | 25% |
| Neutral vegetable oil (canola, avocado, or sunflower) | 120 g | ½ cup + 1 Tbsp | 12% |
| Warm water (see DDT note) | 150 g | ~⅔ cup | 15% |
| Fine sea salt | 18 g | 1 Tbsp | 1.8% |
| Total Dough Weight | ~1,888 g | — | — |
Overall flour in the system (final dough flour + levain flour): 1,100 g
Total hydration (water + eggs + honey + levain water): approximately 55% — a moderately enriched dough, slightly less hydrated than our yeasted version to account for the additional fermentation time and the levain’s water content.
Egg Wash
- 1 large egg (checked for blood spots)
- 1 Tbsp water
- Pinch of fine salt
Optional Toppings
- Sesame seeds (white or black), poppy seeds, or everything bagel seasoning
- Flaky sea salt (Maldon)
Equipment
- Stand mixer with dough hook (preferred) or large mixing bowl for hand kneading
- Instant-read thermometer or probe thermometer
- Kitchen scale (absolutely critical — even more so for sourdough)
- 2 large sheet pans lined with parchment paper
- Bench scraper
- Clear glass or bowl for egg checking
- Plastic wrap or reusable bowl covers
- Pastry brush for egg wash
- Glass jar for levain build (at least 500 ml capacity)
- Rubber band or tape to mark levain rise
Suggested Timeline
Option A: Bake on Friday (Erev Shabbat)
- Thursday 9:00 PM: Build the levain. Go to sleep.
- Friday 6:00–7:00 AM: Levain is ripe (domed, bubbly, passes float test). Mix the dough.
- Friday 7:00 AM–1:00 PM: Bulk fermentation with stretch-and-fold sets (4–6 hours at room temperature).
- Friday 1:00 PM: Divide, shape, and braid.
- Friday 1:30–3:30 PM: Final proof (1.5–2.5 hours).
- Friday 3:30–4:15 PM: Egg wash and bake. Challah ready before candle lighting.
Option B: Overnight Cold Retard
- Wednesday 9:00 PM: Build the levain.
- Thursday 7:00 AM: Mix the dough.
- Thursday 7:00 AM–12:00 PM: Bulk fermentation (4–5 hours).
- Thursday 12:00 PM: Divide, shape, and braid. Place on parchment-lined pans.
- Thursday 12:30 PM: Cover tightly and refrigerate overnight (12–18 hours).
- Friday morning: Remove from fridge. Let warm at room temperature for 1–2 hours until the poke test passes. Egg wash and bake.
Step-by-Step Instructions
Step 1: Build the Levain (8–12 Hours Before Mixing)
In a clean glass jar, combine 20 g ripe sourdough starter, 100 g bread flour, and 100 g room-temperature water. Stir vigorously until no dry flour remains. Scrape down the sides, place a rubber band at the level of the mixture to track its rise, and cover loosely with a lid or cloth.
Leave at room temperature (70–78°F / 21–26°C). The levain will be ready in 8–12 hours, depending on the strength of your starter and the ambient temperature.
How to know the levain is ready:
- It has at least doubled in volume from the rubber band mark.
- The surface is domed — slightly convex, not flat or sunken. If it has begun to collapse, you have passed the peak. It is still usable, but the flavor will be tangier and the rise slower. Ideally, catch it just at or slightly past the dome.
- It is visibly bubbly throughout — large and small bubbles on the surface and visible through the glass.
- It smells pleasantly tangy and yeasty — like yogurt and fresh bread, not harsh or acetone-like.
- Float test: Drop a small spoonful into a glass of room-temperature water. If it floats, the levain is ready. If it sinks, give it another 30–60 minutes and test again.
Timing tip: If you build the levain at 9:00 PM, it will typically be ready between 5:00 and 9:00 AM, depending on your kitchen temperature and starter vigor. In a warm kitchen (78°F+), it may peak in as little as 6 hours. In a cool kitchen (65–68°F), it could take 14+ hours. Get to know your starter’s rhythm — it becomes predictable after a few bakes.
If you oversleep: A levain that has peaked and begun to deflate (by up to 25%) is still usable. The challah will be slightly tangier and may need an extra 30–60 minutes of bulk fermentation. If the levain has fully collapsed and smells strongly of vinegar, discard it and build a new one.
Step 2: Autolyse the Flour (30–45 Minutes Before Full Mix)
In the bowl of a stand mixer, combine the 1,000 g bread flour and 150 g warm water. Mix on low speed for 1 minute, or stir by hand, until all the flour is hydrated and no dry patches remain. The mixture will be a rough, shaggy, dry-looking mass — that is correct.
Cover the bowl with plastic wrap and let it rest for 30–45 minutes.
This is the autolyse (pronounced auto-LEEZ). During this rest, the flour absorbs the water and the gluten proteins begin to align and link without any mechanical kneading. The result: the dough will come together faster, require less mixing, and develop a more extensible, supple gluten network. Autolyse is especially valuable in sourdough baking, where you want to minimize mixing time (which can oxidize the dough and dull the flavor).
Note: We do not add the salt, levain, honey, eggs, or oil during autolyse. The salt would tighten the gluten prematurely, and the fats would coat the flour proteins and inhibit gluten development.
Step 3: Mix the Final Dough
Prepare the wet ingredients: Crack each of the 5 eggs one at a time into a clear glass. Inspect each for blood spots against the light. If clear, transfer to a medium bowl. Whisk the eggs lightly, then add the honey, oil, and the 200 g ripe levain. Stir until combined — the mixture will be thick and golden.
Add the wet mixture to the autolysed flour. Sprinkle the 18 g salt over the top. Attach the dough hook and mix on low speed (speed 1–2) for 3–4 minutes until a rough, cohesive dough forms and no dry flour remains.
Increase to medium speed (speed 3–4) and knead for 6–8 minutes. Because of the autolyse, you will need less mixing time than a non-autolysed dough. Look for these signs:
- The dough pulls cleanly away from the sides of the bowl.
- The surface is smooth and slightly glossy.
- The dough feels soft, supple, and slightly tacky — but not sticky.
Perform the windowpane test: Pinch off a walnut-sized piece. Gently stretch it outward from the center. You should be able to stretch it thin enough to see light through it without tearing. If it tears, knead 2–3 more minutes and test again. With sourdough, the gluten will continue to develop during bulk fermentation, so a slightly less developed windowpane is acceptable at this stage — the stretch-and-fold sets will finish the job.
Check the dough temperature: Target DDT is 76–78°F (24–26°C). Slightly cooler than yeasted challah, because the longer fermentation benefits from a moderate temperature.
Step 4: Hafrashat Challah (Separate Challah)
Before beginning bulk fermentation, perform the mitzvah of Hafrashat Challah. Pinch off a kezayit-sized piece (at least 28 g), recite the bracha as described in the Halachic Notes above, declare “Harei zu challah,” and set the piece aside to be burned.
Many women use this sacred pause for personal prayer and reflection. With sourdough challah — bread raised by wild fermentation, the way it was done for millennia — this moment carries a special resonance. You are standing in an unbroken chain of Jewish bakers stretching back to antiquity.
Step 5: Bulk Fermentation with Stretch-and-Fold Sets (4–6 Hours)
Transfer the dough to a lightly oiled, large, clear container (a clear container lets you monitor the rise from the side). Mark the starting level with a rubber band or piece of tape. Cover with plastic wrap or a lid.
During the first 2 hours, perform 3–4 sets of stretch-and-folds, spaced 30 minutes apart:
- Wet your hand. Reach under one side of the dough, stretch it upward as far as it will go without tearing, and fold it over the top to the opposite side.
- Rotate the container 90 degrees and repeat. Do this for all four sides — that is one set (4 folds).
- Cover and wait 30 minutes. Repeat.
Each set of stretch-and-folds builds strength in the gluten network without the oxidation that comes from mechanical mixing. After the first set, the dough will feel slack and extensible. By the third or fourth set, it will feel noticeably tighter, smoother, and more elastic — it will resist stretching and hold its shape when folded. This progression is your confirmation that gluten development is on track.
After the final set of folds, leave the dough undisturbed for the remaining 2–4 hours of bulk fermentation. The total bulk time will be 4–6 hours at 75–80°F (24–27°C), depending on the vigor of your levain and the ambient temperature.
How to know bulk fermentation is complete:
- The dough has risen by 50–75% from the starting mark. It will not double the way yeasted dough does — sourdough fermentation is gentler and more gradual.
- The surface looks domed, smooth, and slightly bubbly.
- The dough feels airy and jiggly when you gently shake the container.
- When you wet a finger and gently poke the surface, the dough springs back slowly, leaving a slight indentation. If it springs back immediately, give it more time. If the indentation does not fill at all, you have over-fermented.
Patience is the skill here. Sourdough challah ferments slower than yeasted challah — sometimes much slower. If your kitchen is cool (below 72°F / 22°C), bulk fermentation could take 7–8 hours. Do not rush it by placing the dough in a hot oven or on a radiator — excessive heat above 85°F (29°C) kills yeast and favors excessive acid production. If you need to speed things up, place the covered container in your oven with just the light on (this typically creates a 78–82°F environment).
Over-fermentation is the enemy. If the dough has more than doubled, feels slack and extensible (lost its strength), or smells sharply acidic, the wild yeast has exhausted the sugars. The bread will be flat, overly sour, and dense. If you suspect over-fermentation, proceed directly to shaping — do not give it more time.
Step 6: Divide the Dough
Turn the dough out onto a clean, unfloured work surface. Gently deflate by pressing with your palms — sourdough dough is more delicate than yeasted dough, so handle it with care to preserve the gas bubbles.
Using a bench scraper and a scale, divide the dough into 2 equal portions (~940 g each).
For the 4-strand round braid (Rosh Hashanah style), divide each portion into 4 equal strands (~235 g each). For the classic 3-strand braid, divide each portion into 3 equal strands (~313 g each).
Weigh every piece. Precision is even more important with sourdough, where uneven strands will proof at different rates.
Step 7: Shape the Strands
Working with one piece at a time (keep the rest loosely covered):
- Pat the piece into a rough rectangle.
- Starting from the long edge, roll it up tightly like a jelly roll.
- Using both palms, roll the log back and forth on the work surface, applying gentle outward pressure. For the 4-strand braid, each strand should be 45–50 cm (18–20 inches) long. For the 3-strand braid, each strand should be 40–45 cm (16–18 inches) long.
- If the dough resists and springs back, cover it with a towel and rest for 5–10 minutes. Sourdough dough can be tighter than yeasted dough — be patient with shaping.
Step 8: Braid
Option A: 4-Strand Round Braid (Rosh Hashanah Style)
This produces a beautiful round, coiled challah — the traditional shape for Rosh Hashanah and the High Holidays, symbolizing the cyclical nature of the year and the crown of God’s sovereignty.
- Lay 4 strands in a cross pattern (“+” shape), with the strands overlapping at the center. You should have strands pointing up, down, left, and right.
- Starting with the bottom strand, fold it upward over the strand to its left (the right-pointing strand).
- Now take the strand that is now on the right and fold it upward over the strand above it.
- Continue this pattern — always folding the bottom strand over its neighbor to the left, working counterclockwise — until the strands are too short to continue.
- Tuck all the ends underneath the round loaf and pinch firmly to seal.
- Gently cup the loaf with both hands and rotate it on the work surface to tighten and round the shape.
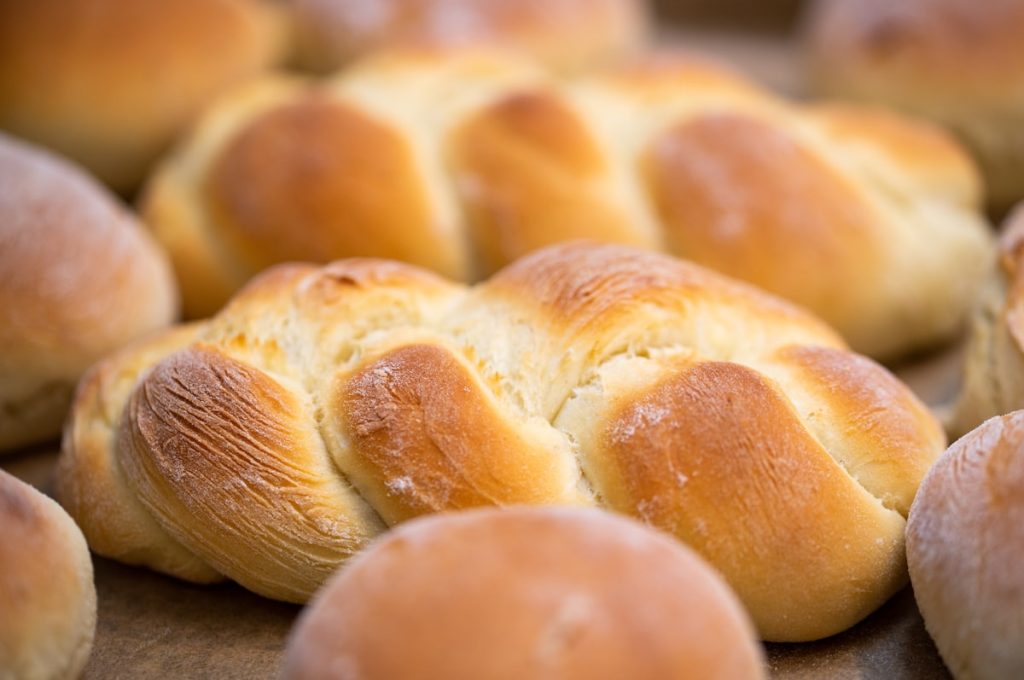
The resulting shape should be a tight, domed spiral — round when viewed from above, with a gentle crown rising in the center.
Option B: Classic 3-Strand Braid
The familiar elongated challah braid — the shape most associated with Shabbat.
- Lay 3 strands side by side vertically. Pinch them firmly together at the top and tuck the pinched end underneath.
- Number the strands 1–3 from left to right.
- Cross strand 1 (left) over strand 2 (center). Strand 1 is now the center strand.
- Cross strand 3 (right) over the new center strand. Strand 3 is now the center.
- Repeat: left over center, right over center, until the strands are too short to continue.
- Pinch the bottom ends together and tuck underneath.
Tips for braiding sourdough challah: Sourdough dough is slightly less extensible than yeasted dough. Braid with a gentle, confident hand — firm enough for definition, loose enough for expansion. If the strands tear or feel too tight, they need more rest time. Cover and wait 10 minutes before continuing.
Carefully transfer each braided loaf to a parchment-lined sheet pan, leaving ample space for expansion.
Step 9: Final Proof (1.5–2.5 Hours, or Overnight Cold Retard)
Cover the loaves loosely with plastic wrap or a lightweight towel.
Room temperature proof: Let them proof at room temperature (75–80°F) for 1.5 to 2.5 hours. Sourdough final proof takes longer than yeasted — be prepared to wait.
The loaves are ready when:
- They have expanded by roughly 50–75% in volume. Do NOT wait for them to double — sourdough challah that has doubled is almost certainly over-proofed.
- The dough feels puffy, pillowy, and noticeably lighter when you gently cup your hand around the side.
- The poke test: Press very gently with a floured fingertip. The indentation should fill back slowly but not completely — a shallow dent should remain. If it springs back immediately, the loaves need more time. If the indentation does not fill at all and feels like overripe fruit, you have over-proofed.
Overnight Cold Retard Option (Pause Here)
After braiding, cover the shaped loaves tightly with plastic wrap (make sure it does not touch the surface of the braids — use toothpicks to tent if needed) and place directly in the refrigerator for 12–18 hours.
On baking day, remove the loaves and let them sit at room temperature for 1–2 hours until the poke test passes as described above. The cold retard develops a deeper, more complex flavor and a richer crust color from the extended fermentation. It also makes Friday baking significantly easier.
Note: Cold-retarded sourdough challah will have a more pronounced tang than room-temperature proofed challah. If you prefer a milder flavor, proof at room temperature and skip the cold retard.
About 20 minutes before baking, preheat your oven to 175°C (350°F) conventional, or 160°C (325°F) convection/fan. Position a rack in the center of the oven.
Step 10: Egg Wash & Toppings
Whisk together the reserved egg (checked for blood spots), water, and pinch of salt until completely smooth.
Using a soft pastry brush, apply a thin, even coat of egg wash over the entire surface of each loaf, getting into every crevice of the braid. Be gentle — sourdough-proofed dough is delicate.
For maximum gloss: Wait 5 minutes and apply a second coat. This double application creates a deep, lacquered, bakery-window shine.
Sprinkle with seeds or toppings if desired. For a stunning presentation, use a sharp blade or lame to make a single shallow score (about 3 mm deep) along the top of each braid strand — this allows controlled expansion in the oven and creates beautiful “ears” along the braid. This is optional and purely aesthetic.
Step 11: Bake
Place the loaves in the preheated oven. Bake for 28–38 minutes, rotating the pans front-to-back halfway through for even browning.
The challah is done when:
- The crust is a deep, rich golden brown — sourdough challah browns more deeply than yeasted challah due to the longer fermentation and acid development. Embrace the color.
- The bottom sounds hollow when tapped with your knuckles.
- An instant-read thermometer inserted into the center reads 190–200°F (88–93°C).
If the top is browning too quickly but the interior is not done, tent loosely with aluminum foil for the remaining bake time.
Step 12: Cool
Transfer the loaves to a wire rack immediately. Let the challah cool for at least 45 minutes before slicing — sourdough bread needs slightly longer cooling than yeasted bread for the crumb to set fully.
As it cools, the crust will crackle softly. The kitchen will fill with a warm, honeyed aroma laced with a faint, beautiful tang — the unmistakable signature of bread that rose on its own time, in its own way, the way bread was always meant to rise.
Storage & Make-Ahead Notes
- Room temperature: Store in a paper bag or bread bag at room temperature for up to 3 days. Sourdough challah stays softer longer than yeasted challah thanks to the organic acids produced during fermentation, which naturally retard staling.
- Freezing (baked): Let loaves cool completely, wrap tightly in plastic wrap then aluminum foil. Freeze for up to 3 months. Thaw at room temperature for 2–3 hours, or warm in a 150°C (300°F) oven for 10–12 minutes.
- Freezing (shaped, unbaked): After braiding, place loaves on a parchment-lined pan and freeze until solid (about 2 hours). Wrap tightly. To bake: unwrap, place on parchment-lined pan, cover, and let thaw/proof at room temperature for 4–5 hours (sourdough takes longer to revive than yeasted) until the poke test passes. Egg wash and bake as directed.
- Day-old sourdough challah: Makes extraordinary French toast — the tang pairs beautifully with maple syrup. Also exceptional for bread pudding.
Troubleshooting Guide
| Problem | Likely Cause | Solution |
|---|---|---|
| Flat loaf that spreads sideways instead of rising | Weak or underfed starter; levain was past peak; over-fermented during bulk | Your starter must reliably double in 4–6 hours before you attempt this recipe. Feed it 2–3 times in the 24 hours before building the levain. Use the levain at or just past the dome — never after it has collapsed. If bulk fermentation exceeded 7–8 hours and the dough feels slack, it has over-fermented. |
| Too sour — the tang overwhelms the sweetness | Fermentation too long or too warm; levain too ripe; cold retard too long | Reduce bulk fermentation time (aim for the shorter end, 4 hours). Use the levain earlier (at the dome, not past it). Skip the cold retard or limit it to 12 hours maximum. For a milder flavor, reduce levain hydration to 75% (use 75 g water instead of 100 g in the build) — a stiffer levain favors yeast over acid-producing bacteria. |
| Dense, heavy crumb | Under-fermented; weak starter; kitchen too cold; insufficient stretch-and-folds | Give the dough the full 4–6 hours for bulk. The 50–75% rise is a visual guide — in a cold kitchen, this may take 7+ hours and that is fine. Ensure you complete all 3–4 sets of stretch-and-folds. If your kitchen is below 70°F (21°C), use your oven with just the light on as a proof box. |
| Braid unravels or gaps form | Dough too tight (insufficient rest); strands too short; poor seal at ends | Let shaped strands rest 10 minutes before braiding if they spring back aggressively. Roll strands longer. Pinch and tuck both ends firmly underneath. Sourdough dough is less extensible than yeasted — it needs more rest between shaping steps. |
| Dough barely rose during bulk fermentation | Starter is not strong enough; kitchen is too cold; levain was under-ripe | Test your starter before baking: it must double within 4–6 hours of feeding. The levain must pass the float test. If your kitchen is cold, find a warmer spot (oven with light on, on top of the refrigerator, near a warm appliance). Do not abandon the dough too early — sourdough takes longer. Give it time. |
| Challah collapses or deflates after baking | Over-proofed during final proof | Final proof should produce a 50–75% rise, NOT a doubling. The poke test is your guide: a slow, partial spring-back is correct. If the dough feels fragile and does not spring back at all, it has gone too far. Bake immediately — even slightly over-proofed dough is better rescued in the oven than left to deflate further. |
| Pale crust despite long bake | Oven temperature too low; egg wash too thick or applied unevenly | Use an oven thermometer to verify temperature. Thin the egg wash with water. Apply two thin coats. Sourdough challah should bake to a deeper brown than yeasted — do not pull it out too early. |
Frequently Asked Questions
Can I make challah with sourdough?
Absolutely — and in fact, sourdough is the original way challah was made. For thousands of years before commercial yeast was available (Fleischmann’s debuted in 1868), every challah was leavened by a sourdough culture maintained by the baker. The result is a challah with more complex flavor, a more tender and open crumb, and a longer shelf life than yeasted versions. The tradeoff is time: where yeasted challah takes 4–5 hours, sourdough challah requires 18–24 hours from levain build to baked loaf. You need an active sourdough starter that reliably doubles within 4–6 hours of feeding. If you are new to sourdough or to challah, we recommend mastering our Classic Challah first, then returning here when you are comfortable with shaping, braiding, and reading fermentation cues.
How long does sourdough challah take?
Plan for 18–24 hours total, though most of that time is hands-off. The levain build takes 8–12 hours (typically overnight). Mixing takes about 20 minutes. Bulk fermentation with stretch-and-folds runs 4–6 hours. Shaping and braiding take 20–30 minutes. Final proof is 1.5–2.5 hours (or 12–18 hours if using the cold retard). Baking is 30–38 minutes. Your actual active time in the kitchen is about 1 hour — the rest is the bread doing its work while you do yours.
Is sourdough challah kosher?
Yes, completely. A sourdough starter is simply flour and water that has been naturally colonized by wild yeast and beneficial bacteria from the environment — there are no non-kosher ingredients or processes involved. The starter requires no hechsher. When this recipe is made with kosher-certified flour, kosher-checked eggs, and kosher oil, the resulting challah is pareve (contains no meat or dairy) and may be served at any meal. Hafrashat Challah should be performed with a bracha, as this recipe uses over 1,000 g of flour. Sourdough leavening is, in fact, the most historically authentic form of Jewish bread-making — it is the very leaven (se’or) referenced throughout the Torah and Talmud.
How do I start a sourdough starter?
You need only two ingredients: flour and water. Mix 50 g whole wheat or rye flour with 50 g lukewarm water in a clean glass jar. Cover loosely and leave at room temperature. For the next 7–10 days, discard all but 25 g each day and feed with 50 g bread flour and 50 g water. By day 3–4 you should see bubbles; by day 6–7, the starter should be rising and falling predictably. Switch to twice-daily feedings once it becomes active. The starter is ready to bake with when it reliably doubles within 4–6 hours of feeding and passes the float test (a spoonful dropped into water floats). See the detailed Starter Maintenance section above for ongoing care, feeding ratios, and how to revive a neglected starter.
Why is my sourdough challah too sour?
Excessive sourness in sourdough challah comes from three sources: (1) the levain was over-ripe (past peak, collapsed) when added to the dough; (2) bulk fermentation went too long, allowing too much acid to accumulate; or (3) the cold retard was extended beyond 18 hours. To fix this, use the levain at the dome or just past it — never after it has fully collapsed. Keep bulk fermentation to 4–5 hours at the shorter end. Skip the cold retard entirely if sourness is a concern. You can also reduce levain hydration to 75% (stiffer levain), which favors yeast activity over acid-producing bacteria and produces a milder, sweeter profile that is ideal for challah. The generous amount of honey in this recipe (15% baker’s percentage) is calibrated to balance moderate tang — trust the formula.
Ancient Craft. Your Hands. Extraordinary Bread.
You just read a recipe that has been waiting for you since before commercial yeast existed. The only thing left is to bake it.
New to Challah? Start with Our Classic Recipe
Try Our Chocolate Babka Next →
Questions about sourdough? Tag us @kosherbreadpro on Instagram or leave a comment below. We answer every one.