Every Jewish bakery has one, and every Jewish family argues about whose is best. Marble cake—the two-tone swirl of vanilla and chocolate in a tall Bundt pan, dusted with powdered sugar—is the silent workhorse of kosher baking. It appears at kiddush without fanfare. It sits on the counter at a shiva house. It waits on a foil-covered tray at every simcha, every bris, every community gathering where someone needed to bring a cake and wanted to bring the right one.
The genius of Jewish marble cake is that it is pareve. No butter, no milk, no cream. Just oil, eggs, sugar, flour, and a good dose of cocoa. This means it can follow a meat meal on Friday night or a dairy lunch on Shabbat afternoon. It can be served at a fleishig kiddush or packed into a dairy dessert spread. It goes everywhere and offends no one. In a kitchen governed by the laws of kashrut, a cake that crosses every boundary is not just convenient—it is essential.
The oil that makes it pareve also makes it extraordinarily moist. Where butter-based cakes begin to dry within a day, oil-based cakes hold their moisture for three, four, even five days. On Monday, a well-wrapped marble cake from Friday is still soft, still swirled, still worth a slice with a cup of coffee. This is not an accident. It is the reason the recipe has survived unchanged in Jewish bakeries for generations.
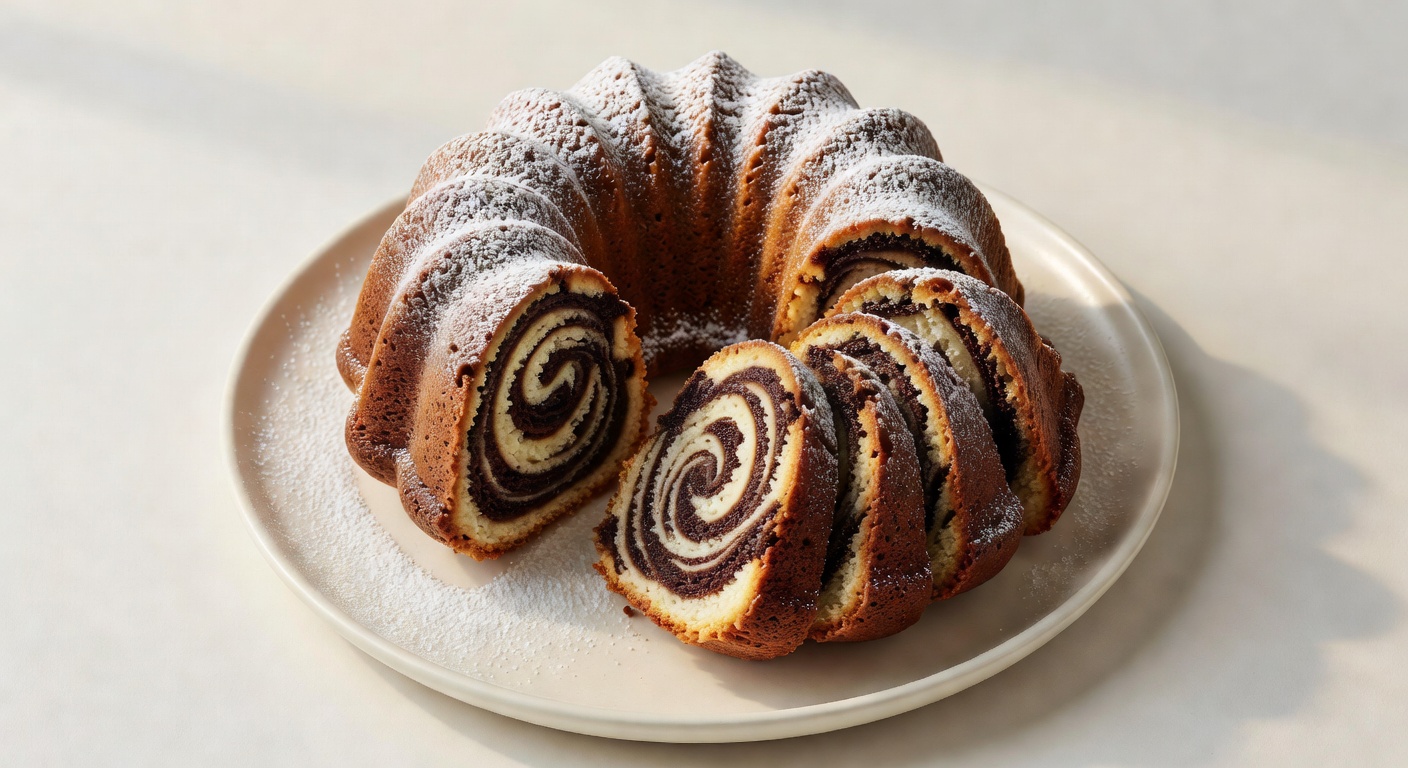
This version is the classic: a tender, fine-crumbed vanilla batter marbled with a deep chocolate swirl, baked in a Bundt pan until the kitchen smells like everything is going to be all right. No frosting. No ganache. Just cake, swirl, and powdered sugar. The way it’s meant to be.
What Makes This Recipe Special
- Pareve perfection — Oil-based with no dairy, making it suitable after meat or dairy meals. The most versatile cake in the kosher baker’s repertoire
- Stays moist for days — Oil does not solidify at room temperature the way butter does, keeping the crumb soft and tender for up to 5 days. Ideal for Shabbat baking on Thursday or Friday
- Real cocoa depth — Dutch-process cocoa plus a splash of hot water creates a chocolate batter that is dark, rich, and deeply flavored—not the pale brown streak of lesser marble cakes
- Easy swirl technique — A simple figure-eight drag with a knife creates dramatic marbling every time. No special skills required
- One-bowl method — The vanilla batter comes together in a single bowl with a whisk. The chocolate portion is mixed separately in a small bowl. Minimal cleanup, maximum result
- Freezes beautifully — Wrap and freeze for up to 3 months. Thaw at room temperature and it tastes freshly baked
Halachic Notes
- Kosher Classification: Pareve — contains no dairy or meat ingredients. Can be served after either meat or dairy meals. Eggs must be checked for blood spots.
- Hafrashat Challah: This recipe uses 300g of flour, well below the shiur. No separation required. If doubling (600g), still below the threshold. If tripling (900g), some opinions may require separation without a bracha.
- Cocoa Powder: Ensure the cocoa powder bears a reliable kosher certification. Most major brands (Hershey’s, Ghirardelli, Droste) carry OU or equivalent. Check for dairy/DE designation—some cocoa powders are processed on dairy equipment.
- Pas Yisroel: While cake is mezonot (not hamotzi), some authorities extend Pas Yisroel to baked goods from the five grains. A Jewish person should light the oven or be involved in baking to satisfy all opinions.
- Brachot: Borei minei mezonot before; Al hamichya after.
- Shabbat Timing: Bake before Shabbat. This cake is excellent at room temperature and needs no reheating. It improves overnight as the crumb settles.
Ingredients
Vanilla Batter
| Ingredient | Grams | Volume | Baker’s % |
|---|---|---|---|
| All-purpose flour | 300g | 2½ cups | 100% |
| Granulated sugar | 250g | 1¼ cups | 83% |
| Neutral oil (canola or sunflower) | 160g | ⅔ cup | 53% |
| Large eggs, room temperature | 150g (3 large) | 3 eggs | 50% |
| Orange juice or water | 120g | ½ cup | 40% |
| Pure vanilla extract | 10g | 2 tsp | 3% |
| Baking powder | 10g | 2½ tsp | 3.3% |
| Fine salt | 3g | ½ tsp | 1% |
Chocolate Swirl
| Ingredient | Grams | Volume | Notes |
|---|---|---|---|
| Dutch-process cocoa powder | 30g | ¼ cup | Kosher certified, pareve |
| Granulated sugar | 50g | ¼ cup | Sweetens the chocolate layer |
| Hot water | 45g | 3 Tbsp | Blooms the cocoa |
| Neutral oil | 15g | 1 Tbsp | Keeps the swirl moist |
Step-by-Step Instructions
Step 1: Prepare the Pan
Preheat the oven to 175°C (350°F). Generously grease a 25cm (10-inch) Bundt pan or tube pan with oil and dust with flour, tapping out the excess. Alternatively, use baking spray with flour. Every crevice must be coated—marble cake has a tender crumb that sticks if given the chance.
Step 2: Make the Chocolate Swirl Paste
In a small bowl, whisk together the cocoa powder, sugar, hot water, and oil until smooth. The mixture should be a thick, glossy paste—like warm chocolate sauce. Set aside. Making this first gives it time to cool slightly while you prepare the vanilla batter.
Step 3: Mix the Vanilla Batter
In a large bowl, whisk together the flour, sugar, baking powder, and salt. Add the eggs, oil, orange juice (or water), and vanilla. Whisk until the batter is smooth and uniform, about 1 minute. Do not overmix—stop as soon as there are no visible pockets of dry flour. The batter will be thick but pourable, similar to thick pancake batter.
Step 4: Create the Chocolate Batter
Transfer approximately one-third of the vanilla batter (about 340g) to a separate bowl. Add the chocolate paste and fold it in with a spatula until the colour is even and no streaks of vanilla remain. You now have two batters: a larger bowl of vanilla and a smaller bowl of chocolate.
Step 5: Layer and Swirl
Spoon half the vanilla batter into the prepared pan, spreading it roughly even. Spoon half the chocolate batter over it in large dollops—don’t try to spread it evenly. Repeat with the remaining vanilla batter, then the remaining chocolate batter. Take a butter knife or skewer and drag it through the batter in a figure-eight pattern, making 4–5 passes. Do not over-swirl—you want distinct ribbons of chocolate against the vanilla, not a homogeneous brown. Less is more.
Step 6: Bake
Bake at 175°C (350°F) for 50–60 minutes. The cake is done when the top is domed and golden, and a wooden skewer inserted into the center comes out clean or with just a few dry crumbs. The cake will pull slightly away from the sides of the pan. Do not overbake—oil cakes go from perfect to dry quickly in the last few minutes.
Step 7: Cool and Unmold
Let the cake cool in the pan for 15 minutes. Invert onto a wire rack and lift the pan off. If the cake resists, tap the bottom of the pan firmly. Let cool completely—at least 45 minutes—before dusting with powdered sugar. The cake is fragile when warm but firms beautifully as it cools. Slice with a serrated knife for the cleanest swirl pattern.
Storage & Make-Ahead
- Room temperature: Wrap tightly in plastic wrap or store under a cake dome. Stays moist for up to 5 days. The oil-based crumb actually improves on day two as the flavours meld.
- Refrigerator: Not recommended. Refrigeration dries out the cake and dulls the chocolate flavour.
- Freezer: Wrap in plastic wrap, then foil. Freezes beautifully for up to 3 months. Thaw at room temperature for 2–3 hours. Add powdered sugar after thawing.
- Shabbat Prep: Bake on Thursday or Friday morning. Wrap well and leave at room temperature. Dust with powdered sugar just before serving if desired.
Troubleshooting
| Problem | Cause | Solution |
|---|---|---|
| No visible swirl (cake looks all brown) | Over-swirling or chocolate batter mixed into vanilla too thoroughly | Make only 4–5 passes with the knife. The batters should remain as distinct ribbons, not blended |
| Pale, weak chocolate swirl | Natural cocoa used instead of Dutch-process, or cocoa not bloomed | Use Dutch-process cocoa for deeper colour and flavour. Always bloom with hot water before adding to batter |
| Cake sticks to Bundt pan | Pan not greased thoroughly | Oil and flour every crevice, or use baking spray with flour. Wait the full 15 minutes before unmolding |
| Dense, heavy crumb | Too much flour (scooped from bag) or batter overmixed | Weigh flour (300g) or spoon into cup and level. Mix until just combined—stop at the first sign of smoothness |
| Dry cake | Overbaked | Check at 50 minutes. Oil cakes go from moist to dry in the last 5 minutes. Pull when skewer shows moist crumbs, not when clean |
| Cake sinks in the center | Underbaked, too much leavening, or oven opened too early | Do not open the oven for the first 40 minutes. Measure baking powder precisely (10g). Bake until skewer is clean |
Frequently Asked Questions
Why use oil instead of butter?
Two reasons. First, kashrut: oil makes the cake pareve, meaning it can be served after any meal—meat or dairy. This flexibility is why marble cake became a staple of Jewish baking. Second, texture: oil remains liquid at room temperature, keeping the crumb soft and moist long after a butter cake would have gone stale. A butter marble cake is delicious on day one; an oil marble cake is delicious on day five. For a kosher kitchen where Shabbat baking happens on Thursday or Friday, this longevity is everything.
Can I use natural cocoa instead of Dutch-process?
You can, but the result will be noticeably different. Natural (non-alkalized) cocoa is lighter in colour, more acidic, and less smooth than Dutch-process. The chocolate swirl will appear pale brown rather than deep mahogany. If using natural cocoa, add ¼ teaspoon of baking soda to the chocolate mixture to neutralize the acidity and deepen the colour. Dutch-process is strongly recommended for the classic look and taste.
Orange juice or water in the batter?
Many Jewish marble cake recipes call for orange juice, and there is good reason: the acidity tenderizes the crumb and the citrus flavour pairs beautifully with both the vanilla and the chocolate. Water works perfectly fine and produces a more neutral-flavoured cake. Orange juice is traditional in Ashkenazi pareve baking (it appears in honey cake, lekach, and many oil-based cakes) and is the choice I recommend. Use fresh or store-bought—both work equally well.
Can I make this in a loaf pan instead of a Bundt?
Absolutely. Divide the batter between two 23×13cm (9×5 inch) loaf pans and reduce the baking time to 40–45 minutes. The swirl pattern will be different—more vertical ribbons than concentric rings—but equally beautiful when sliced. Loaf pans are also easier to unmold than Bundt pans. Grease and line the bottoms with parchment for foolproof release.
What is the best way to get dramatic swirls?
The secret is restraint. Layer the batters in large, distinct blobs rather than thin, even layers. When you drag the knife through, make bold, sweeping figure-eight motions—not tight, fussy circles. Stop after 4–5 passes. The batters will continue to blend slightly as the cake rises in the oven. If it looks a bit under-swirled in the raw batter, it will be perfectly marbled when baked. Every time someone over-swirls, the cake gods give them a plain chocolate cake instead.
More Pareve Baking
Try our pareve banana bread or explore the full recipe collection.